
Contract Testing in CI: Uniting PACT and Jenkins
November 24, 2020
The rise of distributed architecture systems has made it more challenging to ensure quality deployments and production readiness, whether you’re using microservices or not. Like a puzzle, there are now tons of pieces to fit together for everything to work correctly.
This is where a technique like contract testing becomes extremely pertinent. That’s because it allows us to detect communication problems – the puzzle pieces that don’t fit – before the systems begin operating. This preventative work stops errors before they start and can save us a lot of time troubleshooting and debugging.
In this article, we’ll look at how to properly integrate contract testing into continuous integration (CI) workflow. More specifically, we’ll look at a case that integrates pact in a Jenkins pipeline, using the Pact Broker as support.
Why does this matter?
Once we understand the concept and benefits of contract testing, we are almost immediately faced with the question of how to effectively integrate these practices into our daily projects.
At this point, let’s be clear that contract testing is based on verifying that systems are communicating correctly. Obviously, this type of test doesn’t depend solely on our programming, as would be the case with unit tests.
In other words, since both the consumer and producer of services must act to generate and verify contracts, it is highly advisable to have an external system that coordinates the process and provides clear and fast information about what’s happening.
Tools like Jenkins and the Pact Broker are very useful to ensure that the systems are evolving correctly and that we aren’t breaking communication between them while developing new features.
Main features
In a nutshell, here are some of the key features of the three systems that we can use: Pact, Pact Broker and Jenkins.
- Pact
- Generates and verifies contracts
- Publishes contracts in the Pact Broker
- Pact Broker
- Hosts contracts between consumer and provider
- Shows information about the verification status of contracts and versioning
- Launches webhooks before specific, previously defined events
- Jenkins
- Responsible for orchestrating and coordinating verifications for both consumer and provider
- Publishes and notifies about build results
Where can you apply it?
Typical use cases
As previously mentioned, adding contract validation to a Jenkins pipeline is usually recommended, although it’s particularly useful when the provider and consumer development are carried out by different development teams. That’s because in these cases, there are more opportunities to introduce system compatibility errors.
Where it’s not recommended
In situations where APIs undergo very few modifications and/or in systems with a very small number of exposed endpoints, it may not offer too much value and the infrastructure maintenance costs could outweigh any advantages.
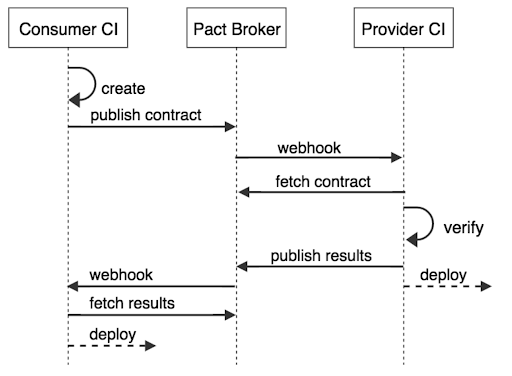
How does it work?
Next, we’ll look at the steps to validate pacts between the consumer and provider in a continuous integration workflow with Jenkins and the Pact Broker.
For this, we’ll use the workflow proposed by pact.io.
Getting ready
First, you’ll need an API-Token in Jenkins for one user.
How to create an API-TOKEN.
- Click on the Jenkins username (in the top right corner).
- On the menu to the left, click “Configure”
- Add a new API TOKEN
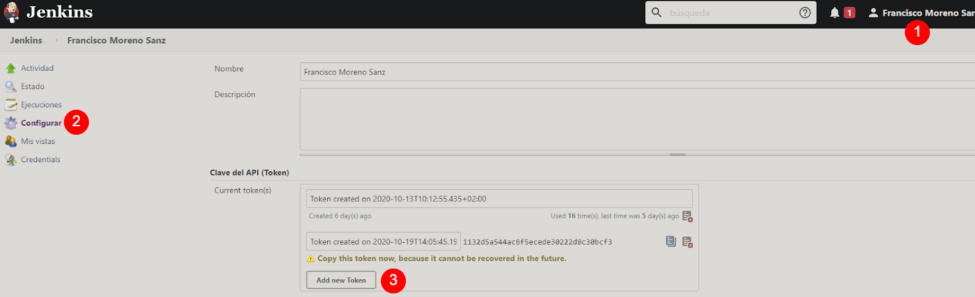
- Copy the value
- To be able to make POST calls from outside, the easiest way is to code the key in Base64 and pass it as an authentication header
- Go to <https://www.base64encode.org/> or use another coding tool
- Enter: JenkinsUsername:API-TOKEN
- For example: frank:11505d62fcdd42d3d7d645ee3f1414297c
- Save the code that’s generated. For example: ZnJhbjoxMWRlZWE5ODBiNmMxZmJkZWYxMjRlZGQ0ZWY3NjhkZWMx
- With this, the calls that we make to our Jenkins to launch the jobs should have the header:
- Authorization: Basic ZnJhbjoxMWRlZWE5ODBiNmMxZmJkZWYxMjRlZGQ0ZWY3NjhkZWMx
Configure the Workflow
It could make sense to perform the following steps in two independent Jenkins instances, but we’ll just do it in one to simplify the process.
All the simple code can be found here.
- Pact Broker pre-configuration with docker
- To allow the connection between the docker container and our local Jenkins, we should add the following links to the docker-compose file:
- PACT\_BROKER\_WEBHOOK\_SCHEME\_WHITELIST: http
- PACT\_BROKER\_WEBHOOK\_HOST\_WHITELIST: 192.168.0.12
- Start Pact Broker:
docker-compose up
Complete docker-compose file for Pact Broker
version: "3"
services:
  postgres:
    image: postgres
    healthcheck:
      test: psql postgres --command "select 1" -U postgres
    ports:
      - "5432:5432"
    environment:
      POSTGRES_USER: postgres
      POSTGRES_PASSWORD: password
      POSTGRES_DB: postgres
  broker_app:
    image: dius/pact-broker
    links:
      - postgres
    ports:
      - 8000:80
    environment:
      PACT_BROKER_BASIC_AUTH_USERNAME: pact_workshop
      PACT_BROKER_BASIC_AUTH_PASSWORD: pact_workshop
      PACT_BROKER_DATABASE_USERNAME: postgres
      PACT_BROKER_DATABASE_PASSWORD: password
      PACT_BROKER_DATABASE_HOST: postgres
      PACT_BROKER_DATABASE_NAME: postgres
      PACT_BROKER_WEBHOOK_SCHEME_WHITELIST: http
      PACT_BROKER_WEBHOOK_HOST_WHITELIST: 192.168.0.12 host.docker.internal
JOB - CONSUMER: Publishing pacts
- Go to Jenkins
- Create a new "Pipeline" task
- Here, we’ll call it: "PublishPacts"
- This step is optional. We could configure the task so that it runs whenever changes are detected in the repository
- Indicate the corresponding “GitHub Project”
- Configure the repository query frequency
- For example, every five minutes -> \*/5 \* \* \* \*
- Create the pipeline for the creation and publication of pacts
pipeline {
        agent any
        stages {
            stage('Get project'){
                steps{
                   git branch: '6-PactBroker', url: 'https://github.com/morvader/Pact-Workshop'
                   bat "npm install"
                }
            }
            stage('Create Pacts') {
                steps {
                    bat "npm run generate-pact-client"
                }
            }
            stage('Publish Pacts') {
                steps {
                    bat "npm run publish-pacts-Broker"
                }
            }
        }
    }
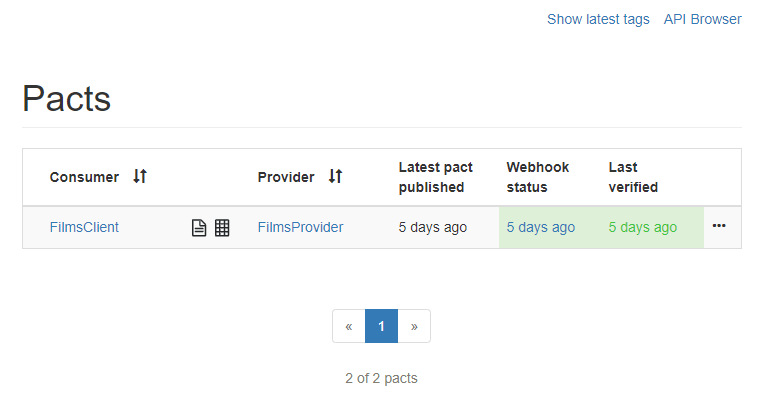
- From here, we should be able to visualize the pacts in the Pact Broker
JOB - PROVIDER: Verify pacts
- Go to Jenkins
- Create a "Pipeline" task"
- Here, we’ll call it: "VerifyPacts"
- This pipeline will carry out various tasks including:
- Verifying that the pacts are fulfilled
- Publishing the verification results in the Pact Broker
- Communicating "can i deploy" to the Pact command to know if it’s safe to deploy the server
- Pipeline:
pipeline {
    agent any
    stages {
        stage('Get project') {
            steps {
                git branch: '6-PactBroker', url: 'https://github.com/morvader/Pact-Workshop'
                script {
                    if (isUnix()) {
                        sh 'npm install'
                    }
                    else {
                        bat 'npm install'
                    }
                }
            }
        }
        stage('Create Pacts') {
            steps {
                script {
                    if (isUnix()) {
                        sh 'npm run pact-server'
                    }
                    else {
                        bat 'npm run pact-server'
                    }
                }
            }
        }
        stage('Can-I-Deploy Server') {
            steps {
                script {
                    if (isUnix()) {
                        sh 'npx pact-broker can-i-deploy --pacticipant FilmsProvider --broker-base-url http://localhost:8000 --broker-username pact_workshop --broker-password pact_workshop --latest'
                    }
                    else {
                        bat 'npx pact-broker can-i-deploy --pacticipant FilmsProvider --broker-base-url http://localhost:8000 --broker-username pact_workshop --broker-password pact_workshop --latest'
                    }
                }
            }
        }
    }
}
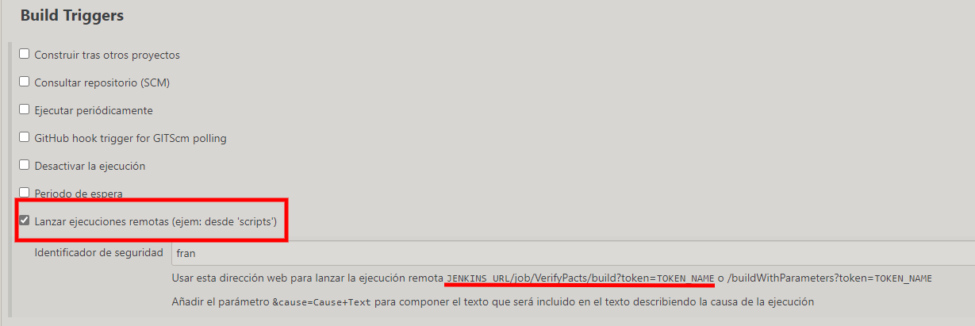
- Ideally, this step is run automatically every time that the pacts are modified. In the following step, we’ll learn how to create a Webhook from the Pact Broker.
- For this, we’ll need to ensure that we check off the box that allows us to launch remote executions and save the URL from which we make the requests.
JOB - CONSUMER: Publish consumer
Once both the provider and consumer have published and verified the pacts, the last step of the process is to verify that it’s safe to deploy the consumer using the "can-i-deploy" tool.
For that, we create another process in Jenkins that is called from the Pact Broker each time that the provider verifies the pacts.
Steps to follow:
- Create a "Pipeline" job in Jenkins
- In this case, we’ll call it: "Deploy Consumer"
- Allow the task to be remotely executed by checking off the corresponding box
- Pipeline:
pipeline {
    agent any
    stages {
        stage('Can-I-Deploy Consumer') {
            steps {
                dir('../PublishPacts'){
                script {
                    if (isUnix()) {
                        sh 'npx pact-broker can-i-deploy --pacticipant FilmsClient --broker-base-url http://localhost:8000 --broker-username pact_workshop --broker-password pact_workshop --latest'
                    }
                    else {
                        bat 'npx pact-broker can-i-deploy --pacticipant FilmsClient --broker-base-url http://localhost:8000 --broker-username pact_workshop --broker-password pact_workshop --latest'
                    }
                }
                }
            }
        }
    }
}
Final stage
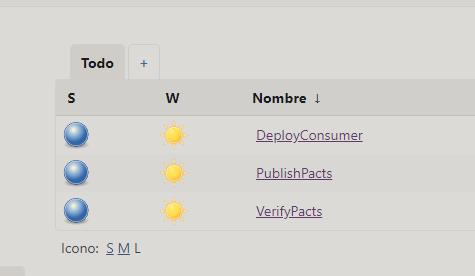
To finish the configuration, we have three distinct jobs left in Jenkins for the tasks of:
- Generating client contracts and publishing in the Pact Broker
- Verifying the provider contracts, publishing the results in the Pact Broker and checking to see if it’s safe to deploy the provider
- Checking to see if it’s safe to deploy the client
Creating Webhooks
Once we’ve uploaded the pacts and pipelines that we’ve created in Jenkins, we’ll configure webhooks in the Pact Broker:
- One of them is so that the provider can verify the validity of the contracts each time they undergo any modification.
-The other is so that the client knows that it can be deployed once the provider publishes the results.
Verifying the provider
From the Pact Broker
- Go to <http://localhost:8000>
- If the previous publication step worked correctly, you should be able to see the published pacts.
- In the column called “Webhook status" click on "Create"
- Then you should see a line called "pb:create" in the column called "NON-GET." Click on the "**!**" symbol.
- A new window will come up where you can introduce the values of a POST request to create the webhook. In it, introduce the following body:
{
  //Events that will make the webhook run
  //For the demo, it will run every time the contract is published. In the real world, it would be typical to launch it every time that the contracts change.
  "events": [
    {
       "name": "contract_content_changed"
    }
  ],
  "request": {
    "method": "POST",
    //URL Jenkins job
    "url": "http://192.168.0.12:8080/job/VerifyPacts/build",
    "headers": {
      // Authorization previously created and coded in base64
      "authorization": "Basic ZnJhbjoxMWRlZWE5ODBiNmMxZmJkZWYxMjRlZGQ0ZWY3NjhkZWMx"
    }
  }
}
Consumer deployment
Then, we’ll create another webhook so the consumer can know when to deploy once the provider publishes the results.
For that, we’ll create a webhook that will be linked to the publication of results on the providers end. It will have the following body:
{
 "events": [
    {
      "name": "provider_verification_published"
    }
  ],
  "request": {
    "method": "POST",
    "url": "http://192.168.0.12:8080/job/DeployConsumer/build",
    "headers": {
      "authorization": "Basic ZnJhbjoxMWRlZWE5ODBiNmMxZmJkZWYxMjRlZGQ0ZWY3NjhkZWMx"
    }
  }
}
This webhook will call the job previously created to check if it’s safe to deploy the client.
The “CAN I DEPLOY” tool
This feature, which is included in the basic installation of Pact, will indicate when it’s safe to deploy any of the parts that make up the pacts stored in the Pact Broker.
It can tell us the following:
- Pacts published by the consumer, but the consumer still hasn’t verified: FALSE. Motive: Cannot be determined
-Pacts published by the consumer, but fail to be verified by the provider: FALSE. Motive: Verification failure
-Pacts published by the consumer, and the provider verifies that they are correct: OK. Motive: It is safe to deploy.
These commands could be launched from the command line at any time.
CHECK CLIENT
npx pact-broker can-i-deploy --pacticipant FilmsClient --broker-base-url http://localhost:8000 --broker-username pact\_workshop --broker-password pact\_workshop --latest
CHECK PROVIDER
npx pact-broker can-i-deploy --pacticipant FilmsProvider --broker-base-url http://localhost:8000 --broker-username pact\_workshop --broker-password pact\_workshop --latest
The result will be a console output of “SUCCESS” or “FAILURE” depending on the status of the contracts.
Final thoughts
Advantages
Integrating contract testing with a continuous integration workflow is the most effective way to apply this testing strategy. When several systems are involved, it is crucial to rely on synchronization mechanisms that are aware of the status of each part at all times.
At the same time, it will only need to be done once at the beginning of the configuration, which means it won’t be something that requires significant maintenance. In most cases, it seems like the initial work is worth it.
Drawbacks
Properly configuring the entire workflow requires a lot of different parts, so you’ll need to have at least basic knowledge of the various tools and technology. On some teams, this could constitute a pretty steep learning curve if knowledge is lacking around essential concepts like webhooks, docker and ideas about consumer-driven contract testing.
In short, it’s useful to be very clear on the basic concepts upon which this configuration is based.
Conclusion
The very nature of the contract testing strategy in real-life projects suffers without a properly configured continuous integration workflow. To get the most out of this testing strategy, it’s key to invest time and effort in contract tracing.
All the sample code can be found here.
Sources
<https://github.com/morvader/Pact-Workshop/tree/6-PactBroker>
<https://docs.pact.io/pact_broker/webhooks>
<https://blog.testproject.io/2020/06/09/integrating-consumer-contract-testing-in-build-pipelines/>
<https://kreuzwerker.de/post/integrating-contract-tests-into-build-pipelines-with-pact-broker-and>