QA + DEVOPS – Dockerizing a Jenkins pipeline
May 14, 2021
This article will examine how to approach quality assurance (QA) with a greater focus on DevOps. It will highlight a continuous integration model, in which code changes are available in final environments error-free and with minimal impacts on infrastructures. This method is also faster than the traditional testing and validation processes.
In this case, we’ll review how to do this by combining the Jenkins and Docker pipelines.

What makes it appealing?
We want a model for building a continuous integration environment with Jenkins and Docker so we can implement testing strategies, test automation and code quality analysis.
That’s because it gives us access to a quality strategy that encompasses the entire life cycle of the software in the Jenkins pipeline. At the same time, it allows us to keep the machine environment as clean and stable as possible. In other words, it frees us from having to host all of the installations and/or versions of the specific software used for each project.
To achieve this goal, we’ll use “watertight” execution environments via Docker technology. In doing so, we can distribute the various tasks into different containers instead of in physical and/or virtual machines. This makes the environments lighter, easier to scale and portable. The last point is of particular interest since we must always ensure that the application’s execution environments are identical throughout its entire life cycle (local environment, integration, production, etc.).
Traditional Model
Typically, to run validation and testing processes for applications, whether manually or automatically, the systems must be deployed in corresponding environments, which are usually shared by several teams or individuals.
This set-up has several drawbacks. On one hand, the company’s operations team usually has to be involved to carry out the deployments correctly. This could create an unnecessary bottleneck if the deployment has to wait for the operations team to be ready.
On the other hand, shared validation environments can lead to overlapping testing and availability issues, which has the potential to decrease the efficiency of the testing processes and even generate confusing test results.
The common model for quality function deployment, typically developed in the software’s life cycle, is based on the operations team incorporating all the necessary infrastructure. This triggers the need for a substantial amount of physical and virtual equipment to meet the requirements of the system being built.
Single instance Jenkins vs Dockerized Jenkins

Where can you use it?
Typical use cases
This model is applicable in any case where you’re using an application server to automate tasks such as building, testing and application deployment.
It’s particularly recommended when working on projects that involve several different technologies, if you lack reserved testing environments and/or if the operations team has limited availability.
Where not to use
Although we find this approach to be highly valuable in most situations, if a company uses a uniform technology stack and the work environments are clearly defined so that overlap and collisions don’t occur in testing, it may not provide as many advantages as in other contexts.
How does it work?
Prerequisites
- Windows 10 PRO
- Java 8+
- Docker and Docker Compose
- Git
Repository
All the code that you’ll need to follow and run this example is available in this repository.
Components
- You need an application from which to run the continuous integration cycle.
- A computer that has Jenkins and Docker installed. Here, we’ll be using our laptop.
- A SonarQube server (in this example, it is also Dockerized).
Below, we’ll elaborate on each of the components.
Application
This involves an application built with Spring Boot Rest API that uses Spring Data MongoDB and Maven to manage the build. As an example, it can implement a student management system’s CRUD operations.
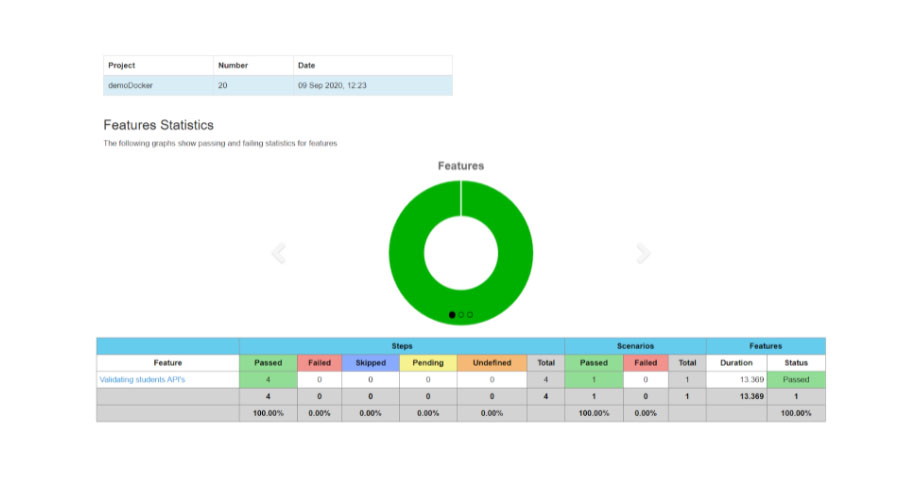
It contains the unit tests, as well as two ways to run functional or e2e integration tests. One is Cucumber + Rest-Assured, the other is via Postman.
To run this project in local and continuous integration, we have the following Docker pieces:
- The Dockerfile file is used to build the image, which contains the necessary commands to do so.
- A docker-compose file to run and pause the application, as well as others that are needed for it to work (the database) and to define a common network to host all the containers.
- Another docker-compose file with the definition of the integration tests, where a container with Newman will be used in the common network, with which it will run the tests defined by Postman in a totally isolated way.
- This is done for demo purposes only. The point is to show the idea that it is possible to Dockerize any kind of test, regardless of the technology or tool being used.
For all the stages in which Maven command will be required, also run the Docker containers so you don’t have to install a JDK or a specific version of Maven in the Jenkins execution environment.
The sample application can be found in the demo-project folder.
Jenkins
Install Jenkins on a local computer, in this case we’re using Windows 10. The computer also must have: JDK, Git, Docker and Docker Compose, as mentioned in the prerequisite section.
For the installation, you have to download the .zip file with the desired version, which you can find here. Then, unzip it, run the file and follow the steps while keeping the default settings.
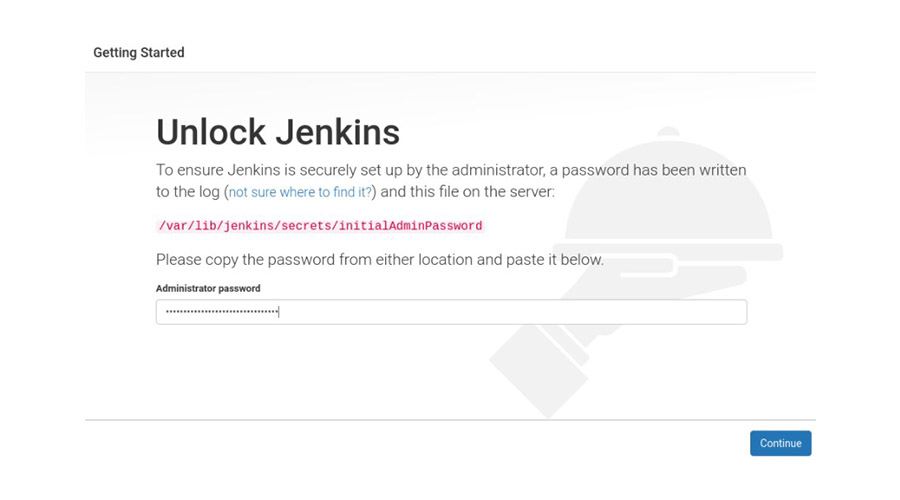
To ensure the installation was correct, open a browser and enter http://localhost:8080. From there, you should see a screen where you can enter the administrator password.
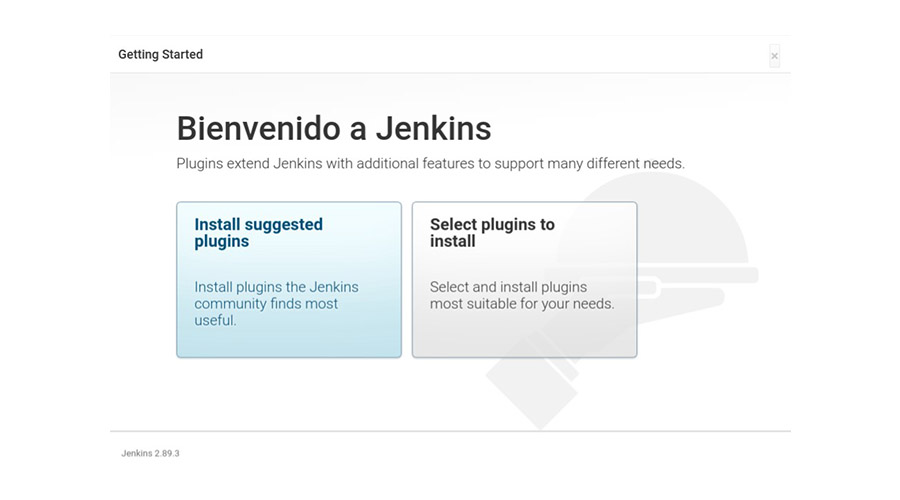
Install the suggested plugins, followed by the Cucumber reports.
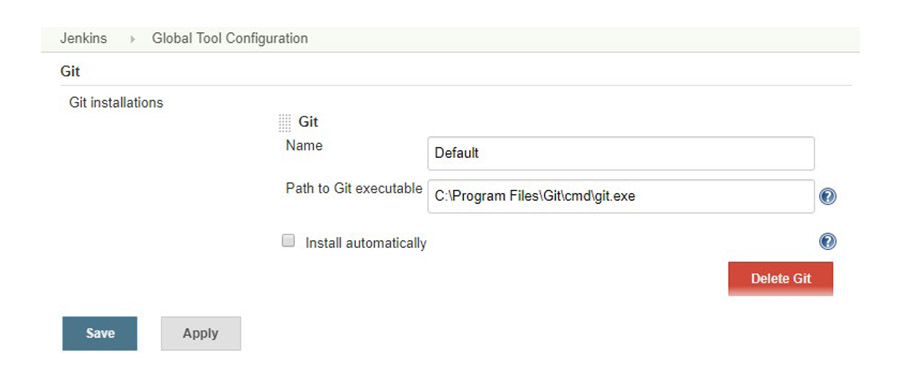
Configure the GIT tool as the global variable.
Then, create a new pipeline task where we’ll configure the “Pipeline script” definition, which is inside the application repository in the Jenkinsfile. You can also set it up as a “Pipeline script from SCM” that is run directly in the Jenkinsfile in the application repository.
We’ll use the first option during the set-up because it’s faster to test. Once that configuration is finalized, we recommend using the latter option.
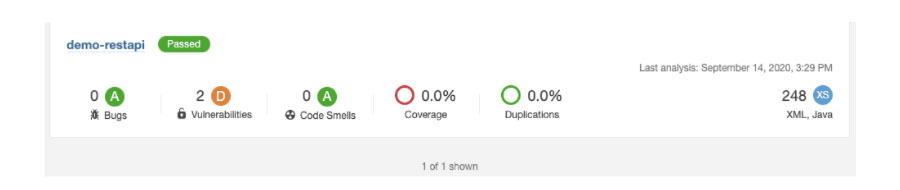
SonarQube
To check the internal quality of the application, we’ll do a code analysis using SonarQube. To do so, we’ll run it in a Docker container with the following commands:
docker pull sonarqube:lts
docker run --name sonarqube -d -p 9000:9000 -p 9092:9092 -v sonarqube_home:/opt/sonarqube/data sonarqube:lts
docker start sonarqube
It can be accessed by entering “http://localhost:9000” with the username: admin/admin.
CI Cycle - Pipeline
The pipeline described below is a demo, so it may not be ideal for real projects.
Our main goal here is to show the concepts that can cover possible Docker integration scenarios with the main Jenkins pipelines and how it can automatically speed up deployments and tests.
All the steps below, except for the local copy of the project using Git, will be run in isolated environments. In other words, each stage will be run in independent containers using Docker.
- Project checkout.
- Compilation and archiving.
- Running unit tests.
- Static code analysis against Sonarqube.
- Run application and necessary databases.
- Execute Cucumber + REST-Assured tests.
- Execute integration tests with Postman.
- Pause the application and containers.
Visually, it’s summed up nicely in the image below, where you can see that each pipeline phase is run in an independent Docker container.
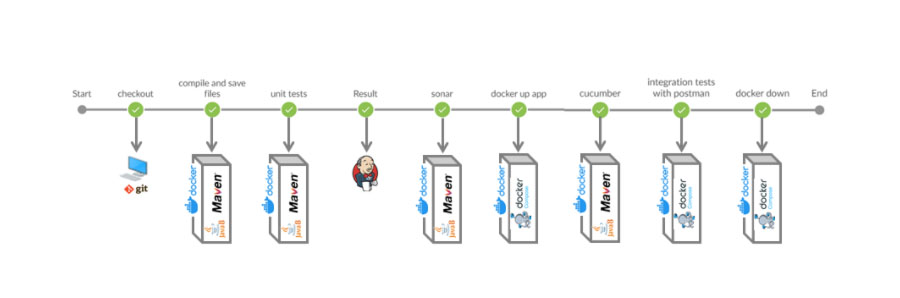
To Dockerize each of these steps, create a composition of containers, which all depend on each other and are linked up in a virtual private network.
The previously mentioned steps translate into the following Jenkins pipeline file:
node('master'){
# Specify the correct route in each case
def mavenFolfer = "C:/Users/{{user}}/.m2";
stage('checkout') {
# Necessary to have already configured the credentials in Jenkins
git branch: 'master', credentialsId: 'GitLab', url: 'https://gitlab.sngular.com/sngulartech/devops_jenkins_and_docker'
}
stage('compile and save files'){
dir("./demo-project") {
bat 'docker run -i --rm --name maven-image -v /var/run/docker.sock:/var/run/docker.sock -v "'+mavenFolfer+'":/root/.m2 -v "%cd%":/usr/src/app -w /usr/src/app maven:3.5.2-jdk-8-alpine mvn clean package -DskipTests'
}
}
stage('unit tests'){
dir("./demo-project") {
bat 'docker run -i --rm --name my-maven-test -v "%cd%":/usr/src/app -v "'+mavenFolfer+'":/root/.m2 -w /usr/src/app maven:3.5.2-jdk-8-alpine mvn test -Pcucumber'
}
}
stage('Result'){
dir("./demo-project") {
junit '**/target/surefire-reports/TEST-*.xml'
archiveArtifacts artifacts: 'demo-project/target*//*.jar', followSymlinks: false, onlyIfSuccessful: true
}
}
stage('sonar'){
dir("./demo-project") {
def localUrl = InetAddress.localHost.hostAddress
URLSONAR = "http://"+localUrl+":9000"
bat 'docker run -i --rm --name my-maven-project -v "%cd%":/usr/src/app -v "'+mavenFolfer+'":/root/.m2 -e SONAR_HOST_URL='+URLSONAR+' -w /usr/src/app maven:3.5.2-jdk-8-alpine mvn sonar:sonar'
}

}
stage('docker up app'){
dir("./demo-project") {
bat 'docker-compose -f docker-compose.yml up -d'
}
}
stage('cucumber'){
dir("./demo-project") {
bat 'docker run -i --rm --name my-maven-test -v "%cd%":/usr/src/app -v "'+mavenFolfer+'":/root/.m2 -w /usr/src/app maven:3.5.2-jdk-8-alpine mvn test'
}
cucumber 'demo-project/target/surefire-reports/cucumber.json'
}
stage('integration tests with postman'){
dir("./demo-project") {
bat 'docker-compose -f docker-compose-integration-tests.yml up'
}
}
stage("docker down"){
dir("./demo-project") {
bat 'docker-compose down --remove-orphans'
}
}
}
Before running the pipeline, there are a few required steps:
- Define the location variable for Maven’s .m2 folder, replacing {{user}} with the correct variable.
- Create the GitLab access credentials and put the identifier ‘GitLab.’
The first time we ran the pipeline, we received the following error message:
Scripts not permitted to use staticMethod java.net.InetAddress getLocalHost. Administrators can decide whether to approve or reject this signature.
That’s because of the “InetAddress.localHost.hostAddress” script insertion to obtain the computer’s IP, which must be recognized to launch the Sonar. To avoid this error, you have to add it to the whitelist as a permitted script in Jenkins. You just have to click on the suggested link that the console’s log displays or go to “Jenkins > Manage Jenkins > In-process Script Approval” and add it manually. This process requires administrator permission.
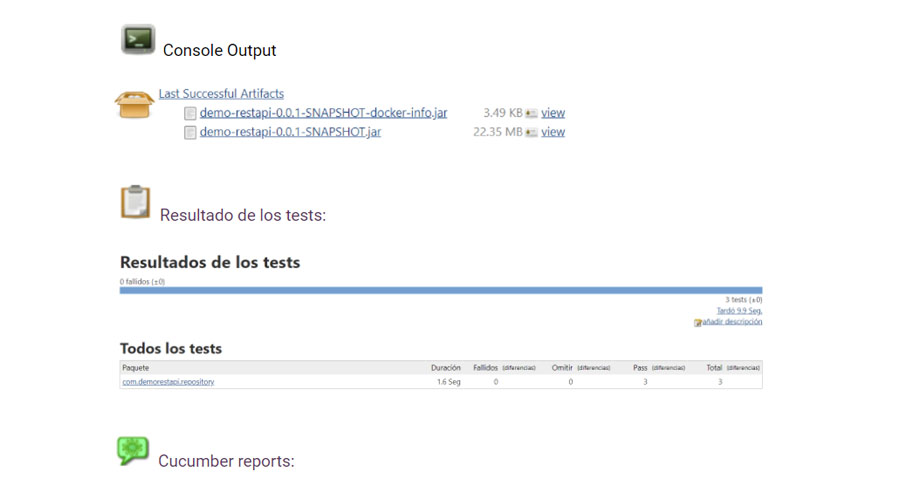
After building the task, you’ll get a log with the result of each phase, the .jar with the compiled application and the reports of both the unit and Cucumber tests:
Console Output:
On the other hand, when we finish the execution we’ll be able to see the results of the static code analysis by going to the SonarQube URL.
Final thoughts
Advantages
The main advantage of the approach is that it minimizes the amount and complexity of the infrastructure needed to complete the integration cycle. At the same time, it allows administrators to scale the applications without having to understand their internal operations.
Another reason we are compelled to use Docker for compilations, tests, etc. is because it allows us to create the same implementation experience that we would have if we were running the services and the rest of the images physically within the platform.
The use of Docker, particularly Docker Compose, also allows us to group the configuration into a single, unified file as code within a continuous integration environment. At the same time, it offers many images with different ready-to-use configurations that can save a lot of time.
Drawbacks
In situations where a large number of builds are being executed simultaneously on the same Jenkins, the machine can reach a saturation point if it isn’t dimensioned correctly. Don’t forget that running Docker containers consumes resources.
In cases like this, node models are handy. That is, a main Jenkins node that derives the execution of pipeline steps from associated nodes (children). This way, the workload is shared and it won’t overload any computer involved in the process.
Conclusion
As we’ve seen, the set-up to run and test an application using this model is a breeze. All you need is Jenkins and to create a Jenkinsfile using Docker in the process for everything to start working automatically.