
Clean Merging
November 29, 2019
The merging process is a way to increase the git history by adding features from a forked version.The git merge command lets you integrate a new development with the previous version. It combines everything together, while keeping the exact order of increments in terms of the dates of creation.
Once this process is used within a team, the git history of a repository reflects exactly what happened. It shows every single change, every single mistake, and every single format change. It shows the little things that are often overlooked.
This article will show you how to take advantage of git to create a useful and confident history of the team’s increments through a process that goes one step beyond what is commonly used in a merge.
The clean merging process
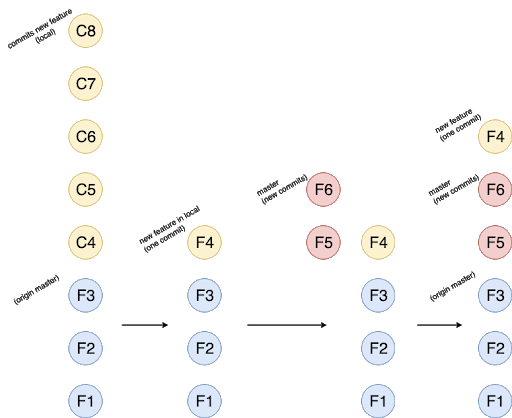 Image 1: Clean Merging Process
This process is composed of four steps, which are separated in columns in Image 1 and follows the direction of the arrows. I’ll describe each step below:
- The new feature started from the origin master. Once it is done in the local, this feature will have a lot of commits (C4, C5, C6, C7, C8..)
- All commits created for the new feature are squashed and a new commit message is created (F4), usually with the description of the feature.
- Before the merge, it's necessary to make a fetch and pull in the master to see if there are more commits. In this example, the master has two commits more than the master version in the beginning of F4, and a rebase onto the master to align the history is required.
- Finally, the result of the rebase in the local shows a history described by features instead of little commits with no information. With the master updated, it's time to push all the changes to the repository.
As shown in Image 2, this process generates a history as a features list instead of a messy collection of commits.
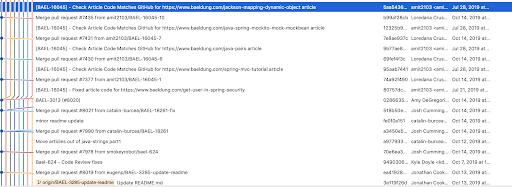 Image 2: Part of the git history of github.com/eugenp/tutorials repository Sourcetree
Tools
This section describes two ways to achieve the clean merging process. The first is done through console and the second uses Sourcetree, assuming that the commits in the local branch are already created.
Git commands
Squash
-
vim commands
VIM is one of the more basic text editors by console and is used for git as the file editor. For this purpose, it is necessary to know that to edit, you click the “i” button and write “:wq” to save and exit.
-
git rebase -i HEAD~[number of commits to squash]
This command will start the process of squashing commits by listing the number specified and showing the legend of commands that could be used in each one:
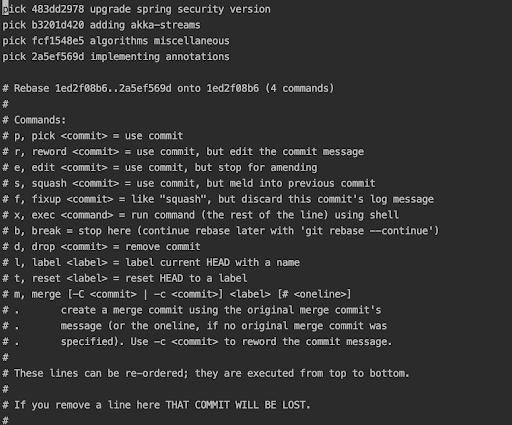
Image 3: Console view to select commits to squash
Image 3 shows the history of the commits in a branch with the format:
“[command] [commit code] description”, which is displayed using VIM editor.
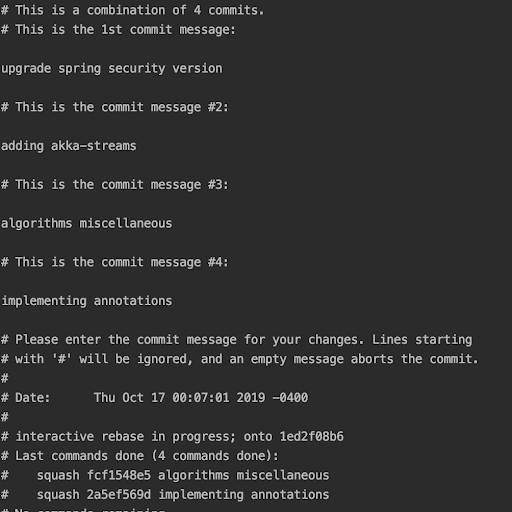 Image 4: Console view to set the message for final commit
Once the commits to squash are annotated with “s” instead of pick, the next step is to set the commit message by writing a new line and removing the other lines with the prefix “#.” This is shown in Image 4, and in the end, it will be just one commit in the local branch.
Rebase
Once the commits have been squashed in the previous step, rebase becomes a sort of merge because there is just one commit to compare against the changes in the destined branch. It also prevents an extra commit for the merge.
-
git rebase master
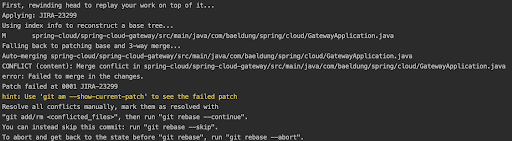 Image 5: Result of git rebase commands with conflicts
In Image 5, the results show a rebase with conflicts because the developers touched the same file. In this image git gives a hint: use git am --show-current-patch to see the failed patch. This will display the conflicts that should be resolved manually.
In order to continue with the rebase, the conflicts should be resolved manually. Once that’s done, as Image 5 shows, with the commands git add/rm <conflicted file> the files will be marked as resolved.
-
git rebase --continue
Once all files are resolved, the next command should be git rebase --continue which will jump to the next commit on the local feature, but in this case this command will finalize the rebase because of the previous squash of all commits.
-
git push --force
Finally, the remote branch, normally called origin/[feature], will be in conflict with the normal git push command. That’s because you need to use the option --force, as it will update the feature branch in the origin and allow for a straightforward merge in the repository.
Source tree
As they say on the Sourcetree webpage, *“*Sourcetree simplifies how you interact with your Git repositories so you can focus on coding. Visualize and manage your repositories through Sourcetree's simple Git GUI.”
Squash
In this example, the branch is still in progress. This accumulates each of the feature’s commits.
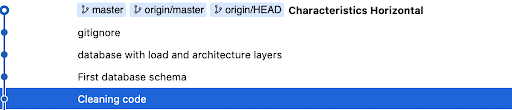 Image 6: Example of a history view in sourcetree
In order to summarize the history, Sourcetree deploys a useful interface to select each commit considered as a small change or one with a poor value.
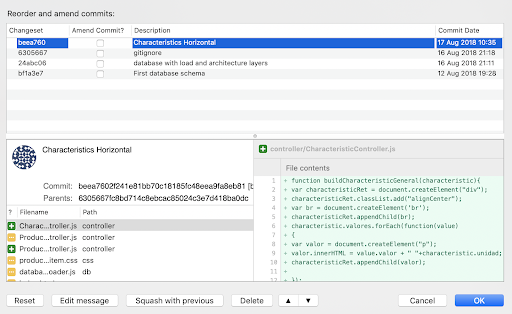 Image 7: Squash window in Sourcetree
Once you’ve selected the commits to squash, just clicking on the button squash with previous Sourcetree generates a suggested description for the new commit named “most recent commit” plus (number of squashed commits), as shown in the image below.
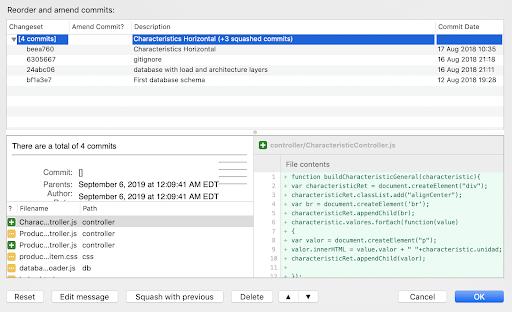 Image 8: Preview before squash
Finally, with the button “Edit message” the final commit can be edited and you can describe the feature developed. In this case, the commit description will be “resume of commits.”
 Image 9: Final commit created from all squashed commits [Taken from sourcetree]
In the previous example, there are no valuables commits that can be ignored and resumed in just one commit that can be named as a Jira ticket with the description to see the increments on the project once at the time.### Rebase
For this step, the process is pretty easy. The user has to select the branch to make the rebase and resolve the conflicts just in case, just as in the "git commands" section. Then, it will be time to push the change. The next image shows the option to rebase onto another branch.
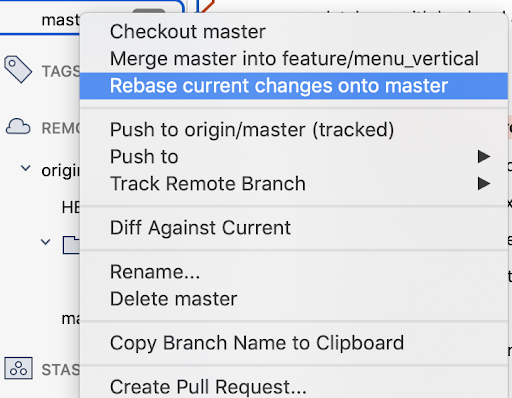 Image 10: Rebase option in Sourcetree interface
Putting all together
As mentioned in the squash section, without this command, each commit will be saved in the history allowing the team to review each commit, even those that are irrelevant.
By rebasing without squash, the process of merging could be difficult because each commit in the branch must be resolved against the final branch and can be compared by making more than one merge by branch.
To resolve these issues, you should squash branch commits and leave only one commit. Then, the rebase onto the master (or in our origin branch), will be straightforward as the merge command. Once the conflicts are resolved, the rebase process is finished.
Once the rebase is ready, the branch will not be synchronized with the branch in the repository, so it’s necessary to give the command: “git push --force”. This will allow you to update the branch with the local changes.Then, wait to merge it without conflicts.
Drawbacks
The repository history will not be completed and we will lose granularity, but it will be a readable history that allows you to follow each new feature.
This process is more complex because the addition of the command squash only allows you to rebase one commit instead of multiple ones. It may be considered a dangerous workflow, because it needs a minimum understanding of the matter. Also, if there is any share interaction in the same branch the “push --force” could remove commits from the repository, but there should always be just be one branch one developer as a golden rule.
Advantages
We gain a new source of information about our project — a “clean history.” This is useful because it allows you to find changes in a feature. It also simplifies the review process as it provides a timeline to follow.
It will increase the collaboration and visibility in a team. By having the time and changes of each history, the review process becomes easier, which saves time for both the reviewer and the developer.
This merging process also creates a history from our repositories automatically. This is a much better way than having to create a history log manually.