
API tests with SoapUI
May 5, 2021
Here, we’ll look at some of the basic concepts surrounding SoapUI and how we can use it to automate API functional testing.
We’ll delve into how to install the tool, get to know the structure of a project in SoapUI, the types of tests we can carry out (Steps, Cases and Suits) and, last but not least, look at the main types of assertions that the tool allows us to use.
What makes it appealing?
SoapUI is one of the most popular tools when it comes to conducting automated tests on REST and SOAP services.
Some of its main advantages are:
- It’s open-source (although there is also a paid PRO version).
- Allows functional testing.
- Allows simulating services (mocking).
- Facilitates load testing.
- Includes a feature to carry out safety tests.
- Has tons of available documentation.
- Can be used to create connections to databases via interfaces like JDBC and JMS.
- It’s always evolving.
- Has a very active community around it.
- Integrates with systems like Maven, Hudson, Bamboo, Junit, ANT, etc.
Each testing project can be exported as an XML file and incorporated into our version control system.
SoapUI is developed on JVM, which allows script development in the Groovy programming language and integration into virtually any Java library. This characteristic is very important given that it adds power and versatility to the tool.
Where can you use it?
Typical use cases
Using the SoapUI tool is particularly interesting when dealing with API testing situations that require a certain level of complexity in terms of preparation and validation.
Having the possibility to make connections with databases and being able to create assertions via scripts in Groovy, gives us more versatility in our tests. This is particularly useful in the following cases:
- When there’s complexity in the preparation of the necessary data for the test
- Database insertions
- Previous calls to other endpoints
- Storing data that come from other calls
- Complexity in restoring the system post-test
- Erasing registers
- Programming complex validations/assertions
- Complex validation of data (requiring certain algorithms/logic)
- Use of external libraries (data processing, sending email, etc.)
Where it’s not recommended
If we need to develop a set of tests rapidly, want to carry out exploratory tests or just simply need to launch calls to our API to check on certain replies or simple results, this isn’t the best tool.
For those situations, using tools like Postman, Hoppscotch or Testmaze are probably better bets.
How does it work?
Where it’s used, prerequisites
Prerequisites:
- JRE 1.6+
- 1GB RAM
- 100MB of free disk space
How to install SoapUi
First, go to the website and download the installer. Once it’s downloaded, double-click on the file and the installer will launch automatically. From there, just follow the recommended steps.
Examples of main use cases
First of all, we have to create a REST project, upon which we’ll add our tests. To do so, follow these steps:
Create the project
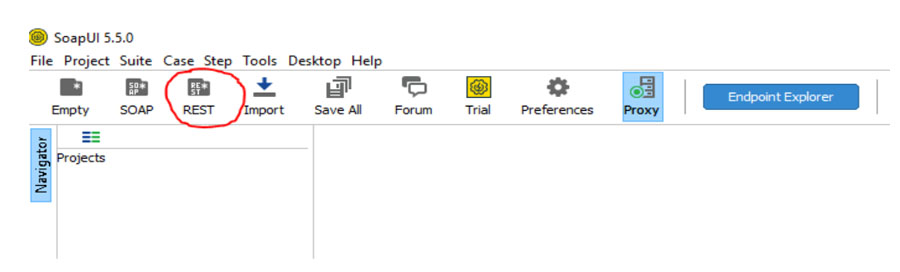
Open SoapUI and click on REST:
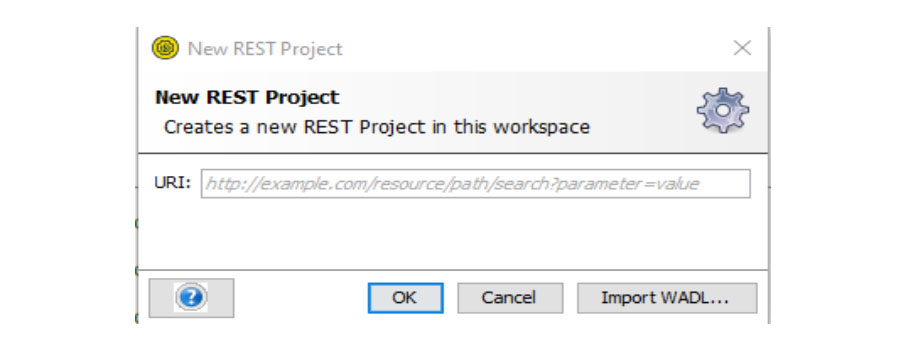
In the next window, introduce your API’s URL, in our case, we’ll use https://reqres.in.
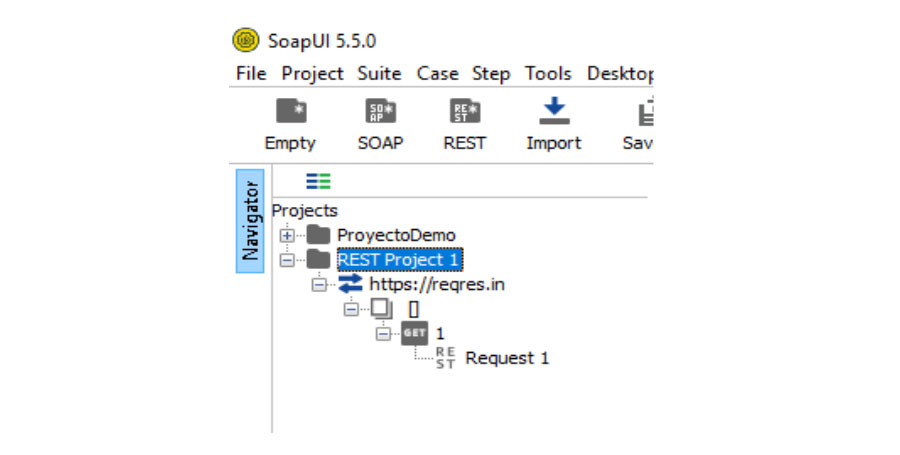
This will generate the structure of our project, which we’ll fill out step by step.
Project structure
Before continuing, we should understand the structure of a SoapUI project:
- Workspace
- Project
- Service
- Resource
- Method
- Request
- Method
- Resource
- TestSuite
- TestCase
- TestSteps
- TestCase
- Service
- Project
Continuing with the creation of our project, we can change the name in the bottom part of the window in the “Project Properties” tab.
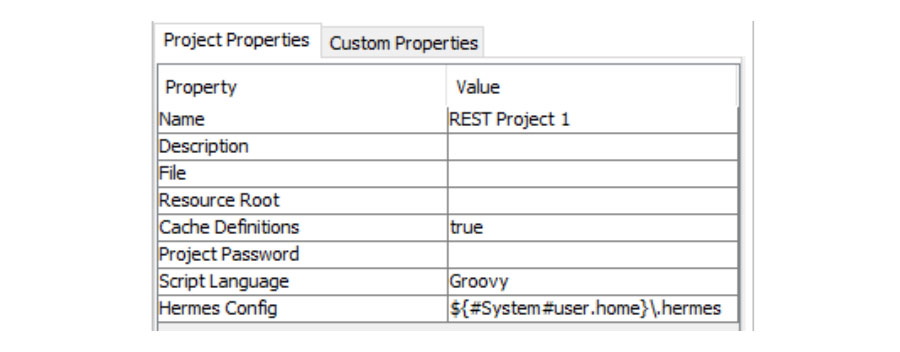
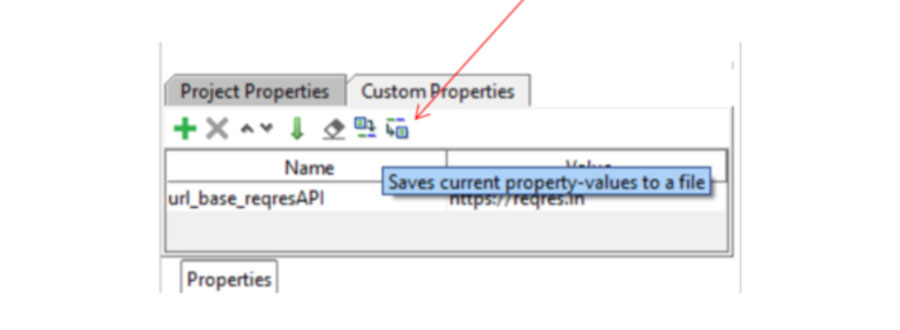
Here, take note of the “Custom Properties” section. If you’re working with more than one environment (development, production, production), it offers an easy way to switch between them.

To use this environment variable, define the following variable: ${#Project#url_base_reqresAPI}
To hang onto the distinct properties, simply save the properties in various files. Do this by clicking on the link shown in the image below:
We’ll now modify the basic structure that was automatically generated and fill it out.
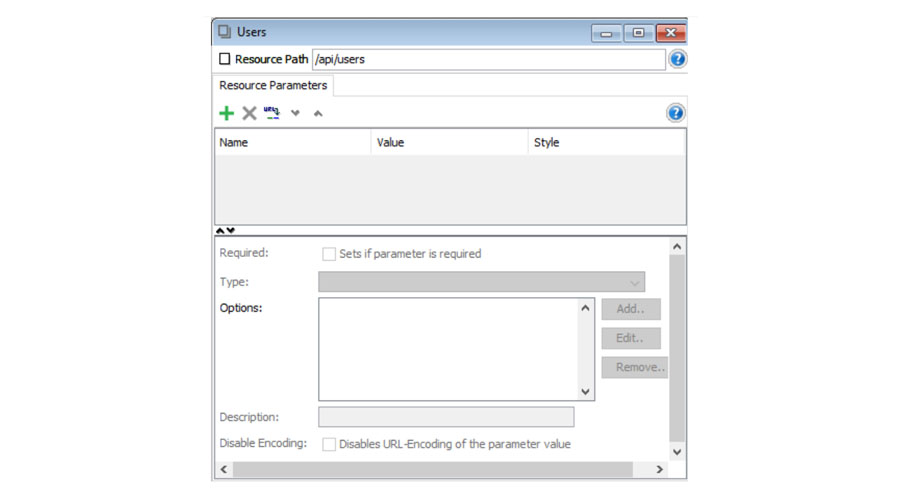
For this, we’ll edit our “Resource.” To do so, double click on Resource. Then, in the window that opens, type in the path on which you’ll be working. In our case, the complete path is: “https://reqres.in/api/users.” Here, we should only add api/users, as we already defined the rest of the path in the superior level (Service).
Creating petitions
The next step is starting to add “methods.” In our example, we’ll use one GET and one POST.
When we created the project, the program already created a “method” so we’ll reuse it and rename it. First, right-click and choose “rename.” We’ll call ours ListUsers. From there, double click on the structure of our method and a new window will open where we can indicate whether it's GET, POST, DELETE, PUT, HEAD, OPTIONS, TRACE, etc.

Once we’ve selected GET, we’ll indicate the parameters that we’ll need. In our case, we just need one to indicate the page, which will be a QUERY type. For that, we click on the green “+,” in the name we’ll write “page,” and in the value, we’ll put “2,” since we’re going to request the user list from page 2.
Once we’ve defined the API call that we’ll be testing, the next step is to check that the response is the one we expected. For that, we’ll create the test in itself.
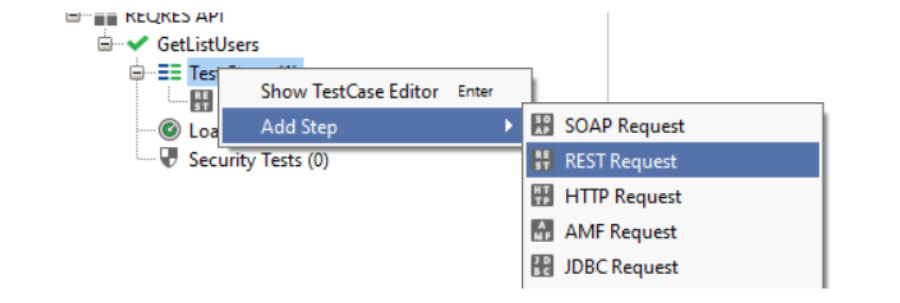
There are various types of requests. One of the most popular and characteristics of this tool is the JDBC Request. In this, when you introduce the database configuration, you can carry out a number of consultations so that you can later compare them with other REST responses and see if they coincide.
In our case, since we don’t have a database configuration, we’ll carry out API tests. To do so, we’ll define a REST Request with which we’ll check to see if the previously defined request brought up the list of users correctly.
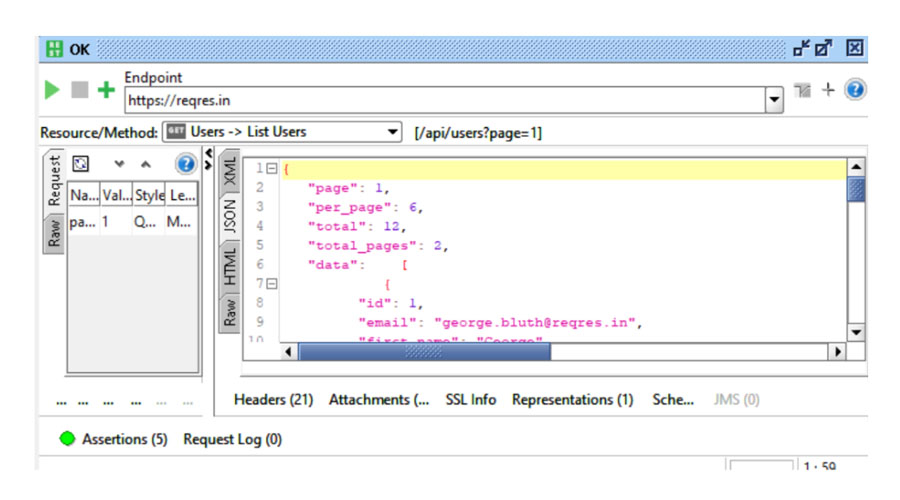
We’ll have to introduce the following values:
- The Endpoint of the API that we’re testing.
- The API’s method or resource.
- The parameters of the request.
- Assertions.
There’s a popup section that shows the request results when you click on the icon.
Adding assertions
The assertion section is where you’ll verify whether or not the call is working correctly. To do so, introduce as many assertions as are considered necessary.
There are several types of checks, which vary according to the origin of the property that the request returns. In our case, since it returned a JSON, we could add the following assertions:
- Contains
- JsonPath Count
- JsonPAth Existence Match
- JsonPath Match
- JsonPath RegEx Match
- Not Contains
- XPath Match
- XQuery Match
At the same time, the origins could be: Scripts, SLA, JMS, JDBC or security information.

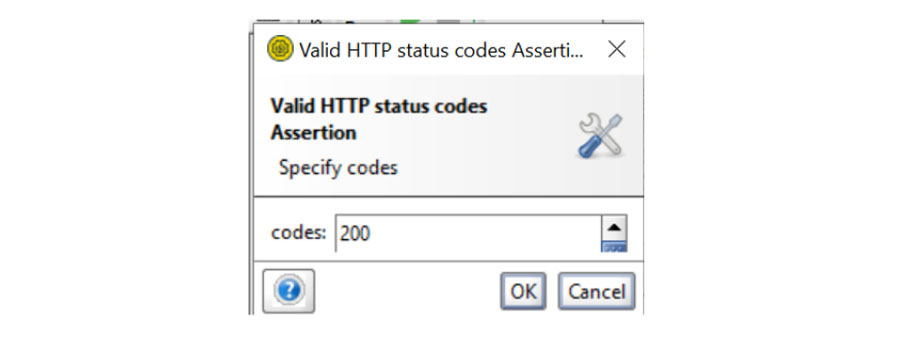
The most common query in this type of request is about the response status code. Since we’re checking a GET method, the code that we’ll verify is a 200.
Another one of the assertions that we added to our project is JsonPath Match. It helps locate elements within the JSON that the petition returns and allows us to compare values, both in terms of a fixed value in the assertion or by using the properties.
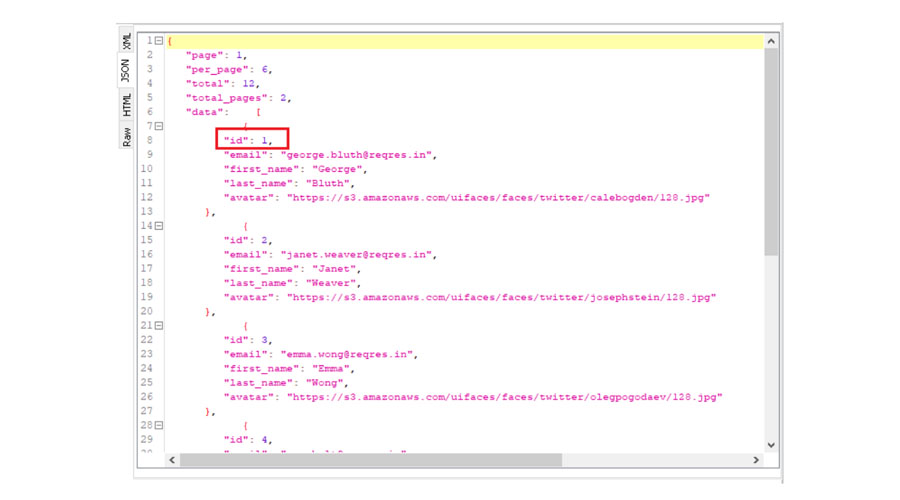
In the image below, we can see what the request returned, where there’s an array of “data” elements, each of them having an:
- id
- first_name
- last_name
- avatar
When creating our assertion, in the top part via $. followed by the field path, we’ll indicate the value that we want to check. In the bottom part, we’ll plug in the expected result.
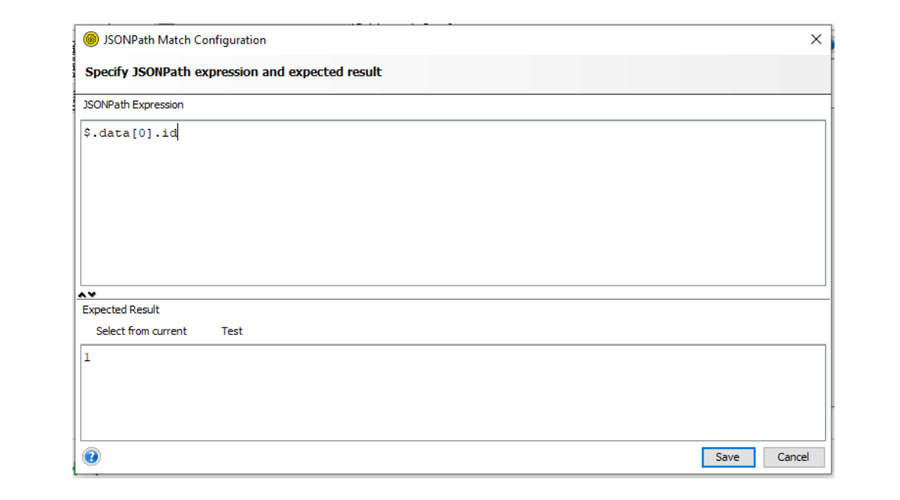
If the assertion fails, you’ll see a red icon around the test case. When clicking on the assertions, they will say which ones failed and why. As you can see in the following image, we put our expectation as a 3 but the JSON returned a 1.

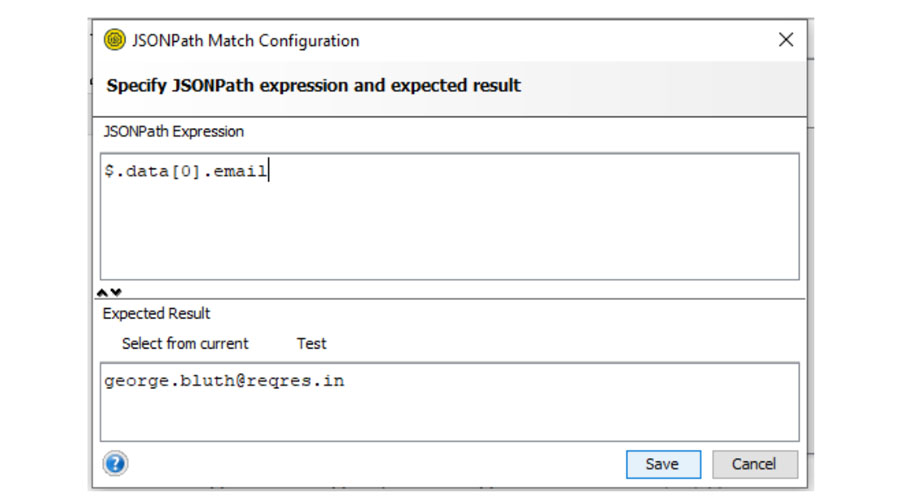
Another example using this type of assertion is comparing the email.
We also have the Script Assertion, which may offer the most possibilities of all. Here, we can write a bit of code in Groovy to carry out more complex tests.
In our example, we’ve received a JSON response that we can parse out and use in our assertion.
As previously mentioned, we can also add a series of properties to our project, to our test case… Here, we’ve defined a property at the test level called email that we’ve given a value which we’ll recover.
def emailProperties = context.testCase.getPropertyValue("email")
Next, we create an array where we’ll store all the emails that we find in the JSON response.
Then, we create our assertion, where we will check if the email that we defined in our property is among those returned by the service.
//imports
import groovy.json.JsonSlurper
//store the response in a variable
def ResponseMessage = messageExchange.response.responseContent
def response = new JsonSlurper().parseText(ResponseMessage)
def i = 0
def infoResponse = response.data
def userEmails = []
//obtain the value of a testCase property
def emailProperties = context.testCase.getPropertyValue("email")
//obtain the json emails
while (infoResponse[i] != null){
userEmails[i] = infoResponse[i].email
//log.info userEmails[i]
i++;}
//search for the required email until finding it in the response, if not Assert KO
assert userEmails.contains(emailProperties)
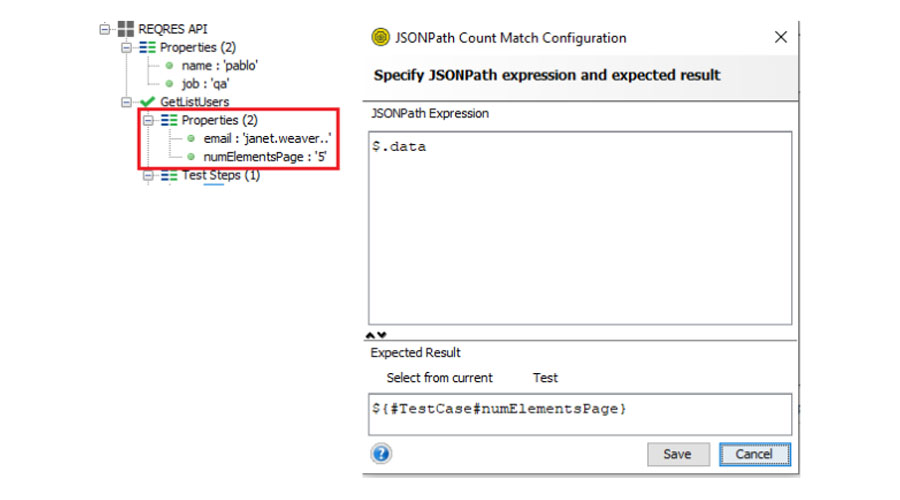
Finally, we’ll take a look at the JsonPath Count type assertion, which we can use to count the number of times the element that we’ve indicated appears in the response. As shown below, in the top part of the window, we’ll type in the element path that we want to count. In the bottom section, we’ll type in our expected result. In this example we’ll also show you how to use a property defined at test case level.
The code for this example can all be found in this repository.
Conclusions
SoapUI originally came about as a tool to test services. This is clear in the fact that it’s oriented around testing and not to simply consume an API manually.
It’s a very powerful application that allows us to test web services (SOAP and REST). It will help us carry out tests that are more complex and versatile than what other similar tools permit.
One of its biggest drawbacks is its interface. It’s not very intuitive and its design is slightly out-of-date.
Another problem is that it’s not very easy to share testing projects with other people who are carrying out parallel modifications. Although you can export the project to an XML file, our experience is that many issues can arise when you try to merge it with other versions.
To sum it up, if you’re looking for an application to carry out a suite of tests that are well structured for a complicated project in the mid-long term, SoapUI is your tool. If you’re looking for something quicker, dynamic and with a smaller learning curve, you’ll probably want to look into other alternatives.